So you want to create an integration just for yourself, between your company in Dinero and some piece of software?
Well, then you've come to the right place. Specifically for personal integrations, you have the option to go around Visma Connect and use a very simple API-key system.
Here we'll take you through it, step by step.
Just to reiterate, ignore everything regarding Visma Connect and Getting Started etc. when using a personal integration, you only need what is documented on this specific page to get access.
Step 1: Apply for credentials
To be able to interact with your company, you need some developer credentials, specifically a client id and secret. You can apply for these directly from Dinero.
First to go Integrationer in the left side menu, then click "Se og opret API-nøgler", then click Personlig Integration and finally Anmod om API-credentials. Please note that this is only possible with a valid Pro subscription, and if your subscription ever expires you will lose your access through the API to the specific organization.
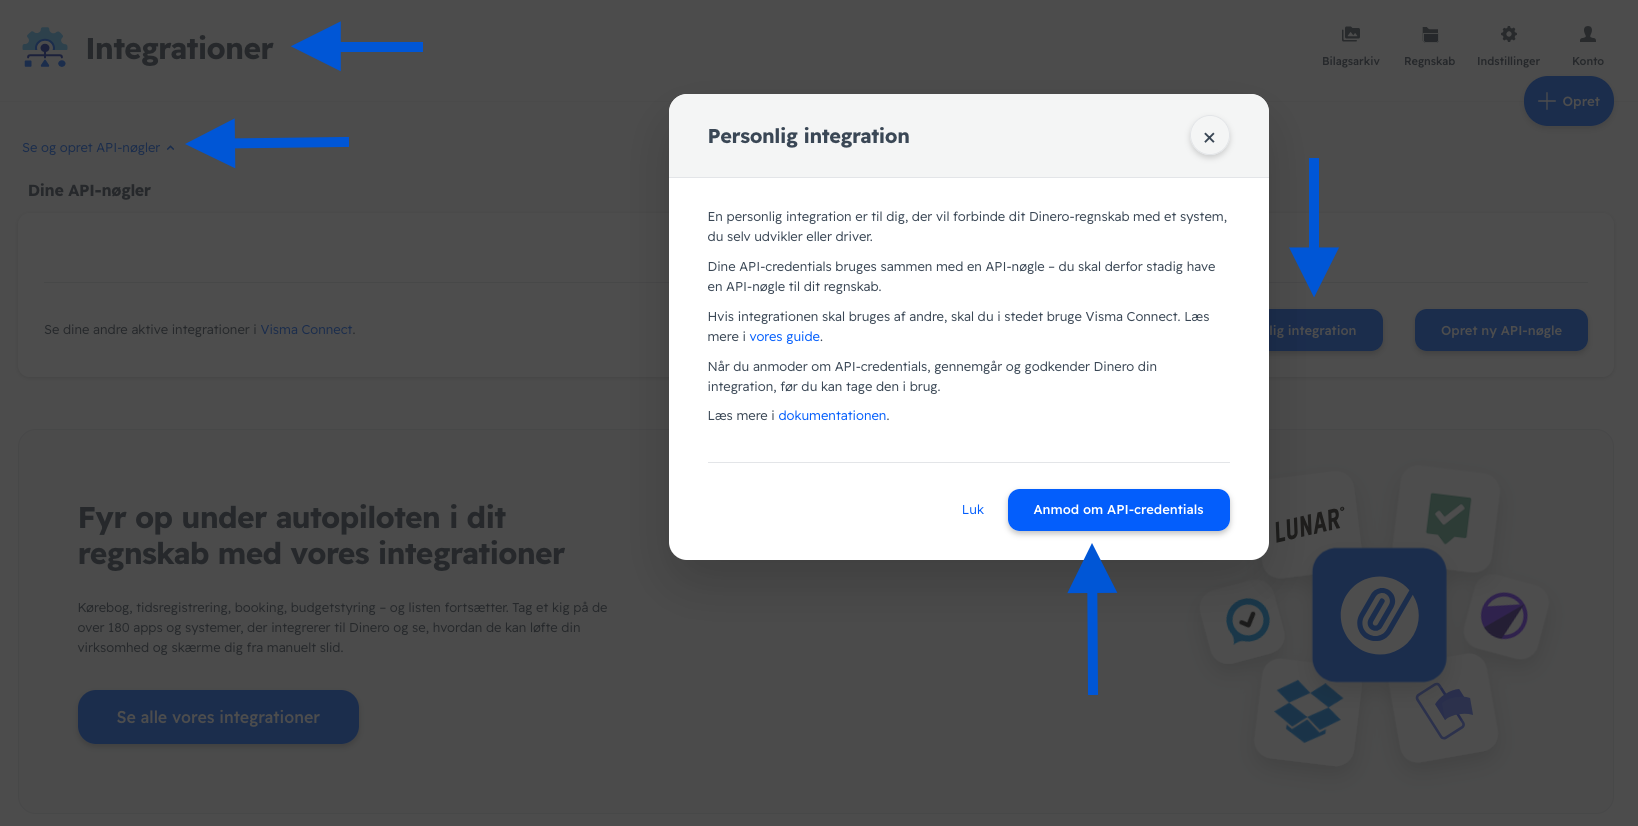
Now save your Client ID and Secret which will be present on the screen, they cannot be recovered and are encrypted on our end. We'll then approve your application within a normal working day on this type of request(and usually within hours). You can also use these credentials across several organizations in case you want to test your integration, before applying it to your actual organization.
Step 2: Encode id and secret
Before being able to fetch an access token, you need to make sure you've base64encoded your client id and secret, separated by a colon, using this formula: client_id:client_secret
You can encode it using this website if you wish: base64encode.org.
For instance, if my client id was rasmus and my secret was dinero, I would base64encode this string: rasmus:dinero - this would give me the following base64encoded id and secret: cmFzbXVzOmRpbmVybw==.
Step 3: Getting an API-key
To get an API-key, you need to go to the organization in Dinero you wish to interact with and generate a new key. You can see here how that is done. You could for instance create a test organization in Dinero, generate an API-key here and use your credentials to test your integration, before generating an API-key on your actual organization. You can even have both at the same time if you want. If you have more than one organization, you can use your credentials across all of them, just generate an API-key on each organization you wish to integrate to.
Step 4: Exchanging for an access token
Last step is to actually get your hands on a bearer access token.
You'll need to POST your encoded client_id, secret and API-key to https://authz.dinero.dk/dineroapi/oauth/token, which will return a json with an access token to that specific organization. This access token will last for one hour. When that times out, you can simply fetch a new one.
Take a look at the examples below for the specifics.
Step 5: Make a request!
You are now authenticated and able to interact with all the endpoints in Dinero. You simply add the access token to the header of your request as so: Authorization: Bearer <token>.
Please note that personal integrations have a rate limit of 60 request per minute. If you exceed this you will receive a status 429 too many requests.
Examples
Curl example
curl -X POST \
    https://authz.dinero.dk/dineroapi/oauth/token \
    -H 'authorization: Basic cmFzbXVzOmRpbmVybw==' \
    -H 'content-type: application/x-www-form-urlencoded' \
    -d 'grant_type=password&scope=read%20write&username=yourApiKey&password=yourApiKey'
Http example
    POST /dineroapi/oauth/token HTTP/1.1
    Host: authz.dinero.dk
    Authorization: Basic cmFzbXVzOmRpbmVybw==
    Content-Type: application/x-www-form-urlencoded
    grant_type=password&scope=read write&username=yourApiKey&password=yourApiKey
Php example
function authenticate(string $uri, string $clientId, string $clientSecret, string $apiKey) {
    $data = [
        'grant_type' => 'password',
        'scope' => 'read write',
        'username' => $apiKey,
        'password' => $apiKey,
    ];

    $encodedClientAndSecret = base64_encode($clientId . ":" . $clientSecret);

    $options = [
        'http' => [
            'header' => "Authorization: Basic $encodedClientAndSecret",
            'method'  => 'POST',
            'content' => http_build_query($data)
        ]
    ];

    $context  = stream_context_create($options);

    $resultPayload = file_get_contents($uri, false, $context);
}
Node example
const http = require("https");
const querystring = require('querystring');

const bodyParameters = querystring.stringify({
    'grant_type': 'password',
    'scope=': 'read write',
    'username': 'yourApiKey',
    'password' 'yourApiKey'
});

const options = {
  'method': 'POST',
  'hostname': 'authz.dinero.dk',
  'path': '/dineroapi/oauth/token',
  'headers': {
    'authorization': 'Basic cmFzbXVzOmRpbmVybw==',
    'Content-Type': 'application/x-www-form-urlencoded',
    'Content-Length': bodyParameters.length
  }
};

new Promise((resolve) => {

    var req = http.request(options, (res) => {
        const chunks = [];

        res.on("data", (chunk) => {
            chunks.push(chunk);
        });

        res.on("end", function () {
            const body = Buffer.concat(chunks).toString();
            resolve(JSON.parse(body));
        });
    });

    req.write(bodyParameters);
    req.end();

}).then(tokenResponse => {

    console.log(tokenResponse);
});
Response example
{
    "access_token":"eyJ0eXAiOiJKV1QiLCJhbGciOiJIUzI1NiJ9(...)",
    "token_type":"Bearer",
    "expires_in":3600,
    "refresh_token":null
}